Month: July 2014

“How To Make Your First Short Film” (part 3 of 3)

We’re back, for the third and final piece in this short filmmaking series of articles. In the first two pieces, we discussed music, (some) audio, lighting, shooting, writing, and a bit of acting. This time around, we will dicuss the final pieces- sound recording, video editing, and audio editing.

Now, I’ve already gotten a lot of feedback about the “raunchy” and “nasty” and “disgusting” sound effects in our short film, “The Minute Glass” (found here). The sounds include a straight razor scraping against someone’s neck, and the razor actually cutting into the neck, with a bit of a blood squirt sound added here and there for effect. Let me explain how it is we did that:

Sound Recording (AKA, foley)

Foley is the art of recording sound effects for a film to recreate everything happening on screen, as these sounds are typically either not picked up while filming, or at least, not picked up very well during filming. After the edit is complete, a list of all required sound effects is built, then given to the foley artist to go out and reproduce. In our case on “The Minute Glass”, we required a phone ringing, a straight razor scraping a neck, a straight razor actually cutting the flesh on the neck, blood squirts, boots walking on hard tile, etc. Most of these are very easy to reproduce, and require very little work or thought.

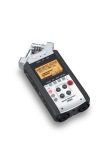
However, the cutting of the throat is what we’ll refer to here. For this, it was very simple, yet it took a bit of creativity (and coincidence). The creativity part was a simple idea- record a watermelon being cut into, then subsequently, being ripped open in half. The lucky coincidence was it being summer, and we had just purchased some watermelon during the day of our shoot (specifically to eat, so we kind of got two birds with one stone!). Layered in with the edited video, this sound improved the scene drastially, though it needed a little bit more. For this, I added Video Copilot’s Action Essentials 2 blood squirt sounds, which I only peppered throughout a bit. To make things more intense, we recorded my heart-beat with our Zoom H4N. We added in the heartbeat, and, with some audio-editing techniques, made it speed up as he was cutting his throat, then come to a halt as he finished. Combined with music (see the first article here), the scene was tense, and I was very happy with the outcome. Audio editing and mixing is a vast subject, worth many articles of explanation on its own, so we’ll save the rest of this subject for another time.

Video Editing

Now on to the actual editing. You will need some sort of video editing software. We use Sony Vegas Pro 12 right now, but are trying out Avid Media Composer on our next project. Windows Movie Maker, or iMovie can be used to an extent, but I would reccomend something at least a little bit better. Sony Vegas Movie Studio starts at $49.95, and HitFilm 2 Express is in the $150 range. These have color correction and grading tools built in, so you will have everything you need to get started making professional-looking short films, and for a cheap price, as compared to the $600+ price range for programs like Vegas Pro, Premiere Pro, Final Cut Pro, or Avid.
Learn to use the editing software as best as you can. For this, there are tons of tutorials on YouTube that will show you how to do specific things in whichever program you need to learn in. Take your footage, and compile it in one folder, titled “Insert Film Title”, Footage. Provided you used an external audio recorder, do the same, but “Insert Film Title”, Audio. This is the setup we use, and it is very easy to simply drag from your card’s storage into these new folders. As soon as that is done, it is best to immediately backup this footage and audio, on either a flash drive, secondary SD card, or an external hard drive. You never know what can happen in the cyber-realm. Once that is completed, I usually open my video editor, and create my titles (which usually just starts out with “Vintage Image Films Presents”, and some sort of textual description). After that, I immediately begin dragging my footage into the program. Since I keep my camera’s built in audio turned on, it drags in an audio piece attached to the video. I keep this here so I can sync up my external audio later on. I take the first shots (not necessarilly the first clips we shot, but the first scene for the film, at least. We shoot out of order completely) and begin to trim them as I see fit.
This process will be further covered in our upcoming behind the scenes for the film.

Color Correcting The Footage

After I have at least one scene trimmed, chopped, and pieced together, I start my color correcting. Don’t confuse color correcting for color grading. We’ll get to that. The coloring process is where I take the visual color tones that I had decided upon (it is always best to decide what look you want before filming, so you can light and shoot for that particular look), and bring them out. I use a basic three-way color wheel. It has color tones for the highlights, mids, and shadows (in Vegas Pro, these are labelled “low” “mid”, & “high”). Typically, I balance the lows to the dark or light blue range. It gives a very subtle dark, psychological look to the footage, but it can make skin tones look too pink. To counter this, I take the mids into the yellow-green range, bringing back the skin tones, and not affecting much other aspects of the clip. Afterward, the highs are either put also into the blue range, or the green range, depending on what the background was, what lights I used, and what color of clothes the actors wore. In this color correcting plugin, I also have control of saturation, gamma and gain. I really enjoy what is called a bleach-bypass look. This was a technique used on film stock development where they would intentionally the bleaching of the negative. It has what could be called a very “filmish” look, and works for horror films, and psychological thrillers very well. To achieve this, I reduce some of the saturation and gamma, which removes some color and adds more contrast to the shadows, then I boost the gain, which blows out the whites and “over exposes” them. To me, it looks very pleasing when used in dark films with deep, psychological themes.

Color-Grading (not to be confused with correcting)

Now, the part about the bleach-bypass look technically fits into the grading category, and not the correcting. Color correcting is where you use the color wheels to match each clip’s color tones to each other, making a seamless transition between to different angles that probably had at least slightly different lighting, which in turn, creates at least, slightly different color ranges. Color grading is where a lot of the actual “look of the film” comes full circle. To do this, I open up several other plugins. Brightness & Contrast, Unsharpen Mask, Sharpening, and sometimes, Color Curves. I really don’t use the “brighten” tool inside Brightness & Contrast, instead, I only focus on the contrast. I add just a bit to make the colors, highlights, and shadows pop more vividly. After this, I add some sharpening, to bring out scars/marks on the actors faces, as well as to remove what might look “blurry”, or “fuzzy” to some. This results in a very sharp, slightly grainy (which I love) HD image that will surely pierce the hearts and minds of audiences. No? Okay then, moving on. Unsharpen mask is a tool that basically does the same thing as sharening, only, instead of focusing mostly on the image as a whole, it will, more or less, only sharpen the outlines of objects within the frame. After this I open up my Pan/Crop, unclick “maintain aspect ratio”, and drag the frame into each other a bit, which adds the faux widescreen bars (even though I am shooting in 23.976fps, 1080p, 16:9 widescreen, the bars do not show up on YouTube, which, for the time being, is the main place I am releasing my stuff). And below, you will see the before and after of a raw frame, to the corrected frame. Voila! And that is how it’s done!


Image16  before corrections & grading

Image15 after corrections & grading


Stay tuned for our upcoming making of, which will show the making of our film, interviews, and most importantly, will give you knowledge on how to make your own.

So if you feel I’ve shorthanded you on this article, don’t fret. There will be a long documentary to help you even further!

Written by Kyle Oliver, 7/16/2014

Copyright 2014 by Kyle Oliver

Kyle Oliver is an award-nominated filmmaker for his first short film Numb, which he wrote and directed. He is also the CEO/Owner of Vintage Image Films. You can find him on Twitter @ThatKyleOliver, and Vintage Image Films on Facebook at http://www.facebook.com/VintageImageFilm

How To Make Your First Short Film, (part 2 of 3)

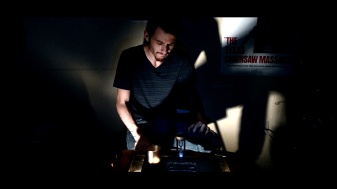
Image3 screenshots from the film courtesy of Vintage Image Films, copyright 2014


Hello all! Yesterday, we (being us here at Vintage Image Films!) released our second official short film, “The Minute Glass”, about a man who must kill himself before the time on a minute glass runs out, or else his wife will be killed by the people who are robbing him. The film was shot for zero dollars and zero cents, and will be linked to at the end of this article. 


I emphasize the non-existent budget because I want my readers to understand the value of that statement. It isn’t a brag, or a flashy thing to show around, because sometimes, a zero-budget can actually be frowned upon. I am merely attempting to demonstrate that a film CAN be made for no money (minus equipment costs, which never count as part of the budget on a film, unless rented specifically for that film). Perhaps a zero budget film will not be the next Hollywood blockbuster, but it can be an artsy, well-crafted piece of cinema made with love, (fake) blood, sweat, stress and immense passion. The key ingredient we had for our film was a script, intentionally written to fit our circumstances. The script contained 4 characters, a minute glass, a cell phone, a straight-razor and some fake blood, which we already had lying around.

Now for the most part, I did everything myself, with a little bit of help from my great collaborator Vincent Diamond, a talented cinematographer and sound editor. To go into depth on our process would not take much time as it was very simple, quick, and to the point. And so I shall elaborate.

Writing The Script.

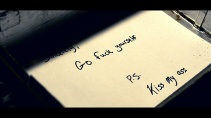
To start, I wrote the script by myself in about a day. I had planned some sort of home-invasion flick where a man and his wife would be intruded by some robbers who are neck deep in trouble from the mob, needing some quick cash to pay them back. So they would choose, at random, my character’s home, kidnap the wife, and hold her for ransom until they got the cash they needed from her husband. But I knew I didn’t have the necessary actors for this, so I decided against showing the actual invasion in-lieu for showing the aftermath. With that, I knew I had a minute glass and a cool straight-razor, so I wrote them into the story. The story we filmed is as follows: James McDermott (the husband) must kill himself within 60 seconds, so a second robber can safely come in and take the money out of his lockbox, and bring it back to the main robber, who has James’ wife, Stella. If James does not complete this in 60 seconds, they will all die, as bombs are triggered to every watch, clock, and glass, in the film. Of course, the robbers were not dumb enough (or smart enough) to set this elaborate plan up themselves. They would never put themselves in death’s reach. It has all been set up by the mob (who are never present on screen, and only mentioned vaguely), who the robbers owe money to. Well, long story short, James does not complete killing himself before the glass runs out, and right after he finishes slicing his own throat with the straight-razor, he hears his wife explode via speakerphone on a private cell phone call from the robber. The second robber comes inside and sees James. He checks the lockbox only to find there actually never was any money in it in the first place, but a vulgar note telling them to “eff off”. The robber finishes James off with a gun, then smokes a cigarette as his clock counts down until the room explodes……       FADE OUT.

Image13

Now when I wrote this, I knew I had CGI bomb effects, and explosion sound effects at my disposal, as well as muzzle flashes for guns, gun sounds, and a realistic-looking airsoft gun “prop” (I ended up not using the CGI explosion as I found cutting to black seemed more effective). Sometimes, I log information like this into my brain, and when I go to write a script, it comes out as needed. I always write for what I know I have, and my brain seems to actively help me do this on its own.

Image14 Video Copilot’s Action Essentials 2

Shooting The Film.

Before shooting, I planned out all of the shots via shot lists (free film paperwork can be found here). The shot lists comprise all of your angles, camera movements, and short descriptions of shots on an easily-readable document, so you can work as smoothly and quickly as possible on-set. The way to write your shot list is to know your script by heart, close your eyes, and watch your film in your head, cut for cut, shot for shot, and transcribe what you see into properly-formatted terms.

SHOT LIST-1 a sample shot list from “L.A. Confidential”, based on the novel by James Ellroy.

Once I had the shot list in place, it was time to make a list of all props, set decoration (like chairs, furniture, tables, etc), clothes that would be worn (wardrobe), the actual gear, and extra things like fake blood, clothes-pins, etc. Our gear comprises of a Nikon D3100 DSLR camera, two lenses (the 18mm-55mm kit lens, and a Nikon 50mm f/1.8D), a Zoom H4N external audio-recorder, many PNY Professional-Grade SD cards, a fluid-head tripod, a pair of headphones for audio monitoring, “can” lights with fluorescent, halogen, and incandescent light-bulbs, white poster board to use as what’s called a “bounce” (for reflecting light to your subject when you don’t require the full light directly on it), and finally, miscellaneous items such as thick black construction paper to wrap around the lights, guiding their flow exactly where you want it, and a thousand or more clothes-pins to clip the construction paper onto the lights.

5-Portable H4n_slant the Nikon D3100 & Zoom H4N external audio recorder- just like we used on our film.

We set up our first angle, and filmed the entire scene in one take, three separate times, noting continuity things, such as, I pick up the straight-razor with my right hand, I use the phone on my right ear, etc. This is necessary in order to make sure each angle matches the next, because, contrary to popular belief, a lot of sets do not use multiple cameras filming at the same time, but instead, film the same scene several times from different angles, using one camera. This is where editing comes into play, but we’ll get to that. We filmed the same scene three times from one angle, moved the camera to a different angle, filmed the same exact thing three more times, switched the angle, did it three more times again, and so on, so forth. (I prefer to do this as a director to not only make sure I have all of the coverage I need, but to assure myself that at least some portion of each three takes per angle will be good enough for use)

After this, we filmed what are called insert shots. Insert shots are things that are not your main subject (which is usually the actor(s)), but sometimes need to be focused upon to establish certain elements, and if not for important reasons, to at least develop a bit of style in the film. Cases of insert shots in my film are closeups of my hand grabbing the straight-razor and/or cell phone, turning the minute glass over, and the final robber grabbing the candle to light his cigarette. These shots are great for establishing small portions of the location, as well as establishing important objects within the scene, which in my film’s case, the objects are almost characters in themselves.

Image12 screenshot from the film

Lighting The Scene.

Now we come to lighting, which probably should have been mentioned before filming, but I wanted to save it for last, as it can be the most tricky aspect. My philosophy on lighting, and my cinematographer Vincent Diamond’s views on it as well, are to walk on set, hook up a light in the one location you know for a fact you want one. In our case, we wanted a sort of quazi-noir look, so we placed the first light directly above the actor (me) and table, which gave off a sort of “interrogation scene” vibe, and I liked it. But if you know anything about filmmaking, you’ll know that one light is never enough. I knew I wanted an immense amount of shadowing on the right side of my face, so we placed another light at about the same level I was sitting, directly facing me, to the left, which gave the intended effect. Looking through the camera, I was fairly happy, but I needed a bit more. Suddenly, we got the wild idea to place a third light underneath the glass table I was sitting at, which shined up through, lit my chin up, and gave a sort of supernatural-surreal look to the scene, as light would never normally pour out from under the table in real life. Looking through the camera, I saw that it wasn’t too obvious (because you never want viewers to really notice what you’re doing, where lights are, what’s a dubbed sound and what’s not). I was really happy with the overall look, so we used it.

Image11 the look of the film is dark, with deep contrasted shadows, and semi-washed-out highlights.

That’s my, and Vincent’s, ideology on lighting a scene. Walk in, set your camera up at the particular angle you like, start with one light, make sure it looks good through the camera’s lens (because what might look good with your eyes might look bad through a lens), and continue building upon it, one light at a time, because one light is never enough (unless your one light is the Sun, then you might actually need something to diffuse it!).


That’s all for this part. Next (and final) volume, I shall discuss the entire editing, color correcting, and color-grading process, as well as sound effects, and sound editing.

Don’t forget that we are doing an in-depth “behind the scenes” documentary which will teach you all you need to know to make your first short film for nothing (as well as being overloaded with my own cinematic opinions).

And finally, don’t forget to watch the actual short film you just read so much about! You can find it here.

Thanks for reading, and thanks in advance for watching! Feel free to leave comments, criticism and concerns in the comments section.

written by Kyle Oliver, 7/10/2014

Copyright 2014 by Kyle Oliver

Kyle Oliver is an award-nominated filmmaker for his first short film Numb, which he wrote and directed. He is also the CEO/Owner of Vintage Image Films. You can find him on Twitter @ThatKyleOliver, and Vintage Image Films on Facebook at http://www.facebook.com/VintageImageFilm